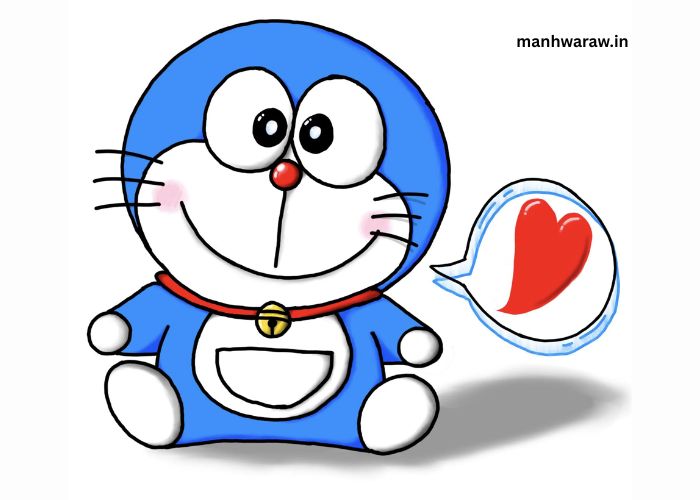
Doraemon is one of the most beloved cartoon characters in the world, especially in Japan and India. Known for his round face, blue color, and fun gadgets, Doraemon has won the hearts of children everywhere. If your child is a fan of Doraemon and wants to learn how to draw him, you’re in the right place! This step-by-step guide will teach kids how to draw Doraemon easily and quickly, while having fun with the process.
Drawing not only enhances creativity, but it also helps kids develop fine motor skills, focus, and patience. In this tutorial, we’ll go through the steps for creating a simple, cartoon-style Doraemon drawing that kids can easily follow. The steps are simple, fun, and perfect for beginners. By the end of this tutorial, kids will be able to draw Doraemon on their own and add their own personal touch to make him unique.
Key Points:
- This tutorial is easy to follow and great for kids of all ages.
- The step-by-step instructions ensure success for beginners.
- Kids will develop both their artistic skills and creativity.
How Do You Start a Doraemon Drawing?
The first step to drawing Doraemon is understanding the basic shape of the character. Doraemon has a circular head and a slightly oval body. In this section, we will focus on getting the initial shapes right before adding the finer details. Starting with the basic shapes ensures that the drawing is proportionate and looks like Doraemon.
1. Sketching the Basic Shapes
Begin by drawing a large circle in the center of your page. This will be the head of Doraemon. Next, draw a smaller oval shape beneath the circle for his body. Don’t worry about getting it perfect at first. The main goal is to capture the right proportions so that the face and body appear balanced.
After that, draw two lines extending from the top of the circle. These lines will serve as guidelines for the position of Doraemon’s ears and the bottom of his body. It’s important to keep the guidelines light so that they can be erased later once the drawing is complete.
2. Adding the Facial Features
Doraemon’s face is a crucial part of the drawing, so we’ll focus on getting it right. Start by drawing two small circles near the top of the head for his eyes. Make sure they are placed symmetrically and leave enough space between them for the nose.
Next, draw a small, round nose in the middle of the face, just below the eyes. Then, add a large curved line underneath the nose for Doraemon’s mouth. Draw a “W” shape in the center of the mouth to represent his cheerful smile.
For the finishing touches on the face, draw two small curved lines above the eyes for his eyebrows. Lastly, add Doraemon’s signature bell-shaped collar by drawing a small rectangle beneath his head.
What Are the Key Steps for Drawing Doraemon’s Body and Arms?
Once the face is completed, we move on to Doraemon’s body and arms. This part of the drawing focuses on giving Doraemon his unique shape, which makes him so recognizable. Let’s go step by step to ensure that his body and limbs are drawn perfectly.
1. Drawing the Arms and Hands
Now that we have Doraemon’s face, let’s focus on his arms. Doraemon has small, simple arms that stick out from his body. Start by drawing two short, curved lines extending from either side of the oval-shaped body. These lines will represent the upper arms. Add small rounded ovals at the ends of these lines for his hands. You don’t need to add too much detail to the hands—just a simple shape will do.
2. Adding the Legs and Feet
For the legs, draw two short vertical lines extending down from the bottom of the body. At the ends of these lines, draw large, rounded shoes. Doraemon’s feet are simple and exaggerated in size, making them one of his most distinguishing features.
Now, draw a curved line from the middle of his body to the feet. This line will give shape to his pants, making it appear like Doraemon is wearing a rounded suit.
3. Refining the Details
Once the body, arms, and legs are in place, go back and refine the details. Add Doraemon’s signature three whisker lines on each side of his face. Erase any unnecessary lines used as guidelines. This will help to clean up the drawing and give it a polished look.
How Can You Color the Doraemon Drawing?
Coloring your Doraemon drawing is the most fun part of the process! In this section, we will guide you on how to add the right colors to bring your character to life.
1. Choosing the Right Colors
Doraemon is primarily blue, but his face, belly, and hands are white. Use blue for his body and face, leaving the center of his face and belly white. For the nose, use a bright red, and don’t forget to color his collar and bell yellow. His eyes should be black with a little white spot to give them shine.
2. Applying the Colors
Using crayons, colored pencils, or markers, start by coloring the body and head with blue. Be sure to stay within the lines and add more color where necessary. After that, fill in the white sections like his belly and face. For the nose, use a vibrant red color to make it stand out.
Next, color the collar yellow and the bell with a golden shade. For the eyes, color the pupils black and leave a small spot white to create that signature shine that makes Doraemon’s eyes look so expressive. Finally, add a bit of pink to his tongue to give him a lively, friendly look.
What Tips and Tricks Can Help Kids Improve Their Drawing Skills?
Drawing is a skill that gets better with practice, and there are some useful tips that kids can use to improve their skills. Whether you’re drawing Doraemon or any other character, following these steps can make a big difference in the quality of the final product.
1. Start with Basic Shapes
Begin every drawing with basic shapes like circles, ovals, and squares. This approach helps to break the character down into simpler parts, which are easier to draw. By focusing on the basic shapes first, you will find it easier to add details later.
2. Use Light Pencil Strokes
When sketching out the drawing, use light pencil strokes that can be erased later. This allows you to make changes easily as you refine the shapes and lines. Once you’re happy with the drawing, you can go over it with darker lines.
3. Take Your Time
Don’t rush the process. Drawing is all about patience, so take your time with each step. Start with the basic shapes, refine the details, and add color when you’re ready. It’s okay to make mistakes along the way—this is part of the learning process!
Conclusion
Drawing Doraemon step by step is a fun and creative activity that kids will enjoy. By following these easy-to-understand steps, kids can create a lovable version of Doraemon and feel proud of their work. Whether it’s for a school project, personal fun, or sharing with friends, learning to draw this iconic character opens up a world of creativity and artistic expression.
Note: Practice makes perfect, so keep trying and enjoy the process of creating art!
Note: Don’t forget to use different colors and experiment with your own style when drawing Doraemon!
FAQ’s
- Is this drawing tutorial suitable for beginners?
Yes, this tutorial is designed for beginners and kids, with simple, step-by-step instructions that make it easy to follow. - What materials do I need to draw Doraemon?
You will need a pencil, eraser, paper, and coloring tools like crayons, colored pencils, or markers. - Can I customize my Doraemon drawing?
Absolutely! You can add your own personal touch by using different colors or accessories for Doraemon. - How long does it take to finish the Doraemon drawing?
It depends on how much detail you want to add, but it typically takes about 30 minutes to 1 hour for kids to complete. - Can I use digital tools to draw Doraemon?
Yes, you can use digital drawing apps or programs if you prefer drawing on a tablet or computer.